Wednesday, July 26, 2017
Stormtrooper Belt and Ammo Knee Measurements
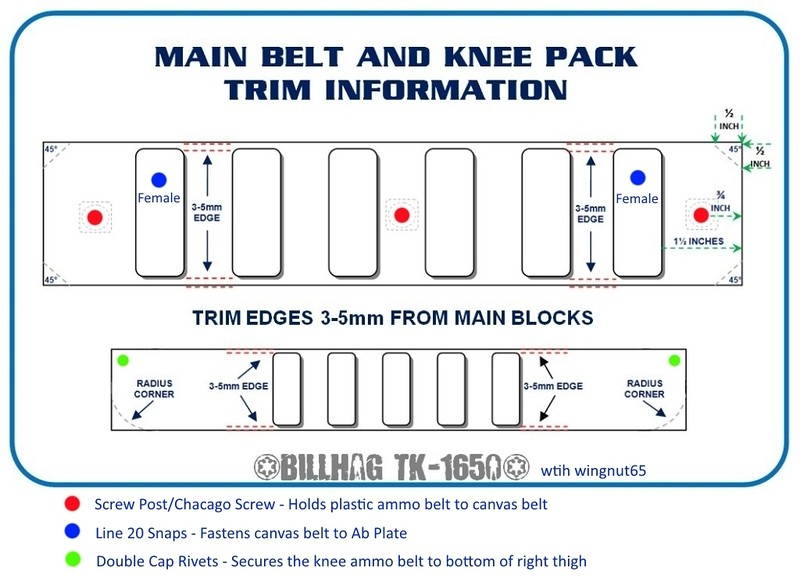
This graphic helped me a lot to understand where the connections should be made on the knee and belt. These measurements are not exact- it depends on your armor type to decide exactly where the fasteners should go. Don't rely on numerical measurements.
Stormtrooper Belt Corners
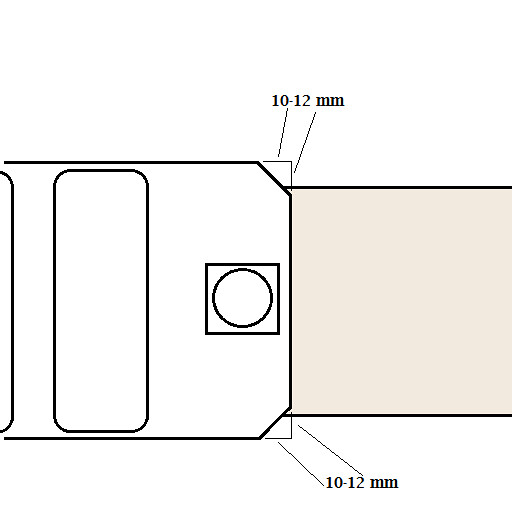
I spent two- yes TWO- hours yesterday trying to find the measurements for the corner angles for the TK belt. I thought I'd bookmarked or noted this info somewhere several months ago, but nooooo.... or it's there and I can't find it. I feel like Gretel in the forest with my trail of breadcrumbs sometimes.
I finally found it buried in a thread, though. And I'm reposting it here because I know I'll lose it again somehow. The corner angles should just meet at the belt. Not overlapping the belt.
Working on joining and gluing the fronts of the thighs and trimming down the belt today.
I finally found it buried in a thread, though. And I'm reposting it here because I know I'll lose it again somehow. The corner angles should just meet at the belt. Not overlapping the belt.
Working on joining and gluing the fronts of the thighs and trimming down the belt today.
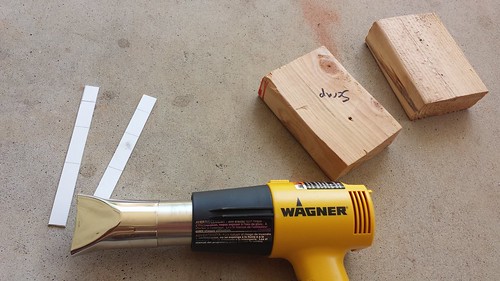
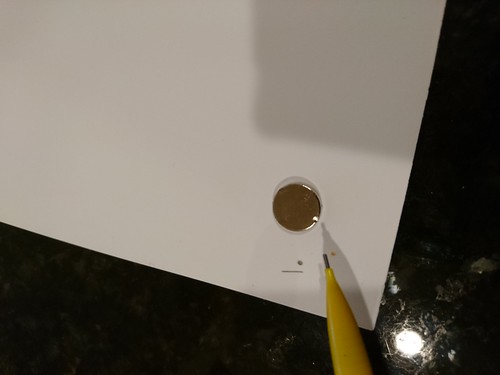
Making Stormtrooper Cover Strips
Oh, well I can't mess up cover strips too much, can I? These are all for my legs since the cover strips for the arms are done. I've got enough to do the insides and outsides.
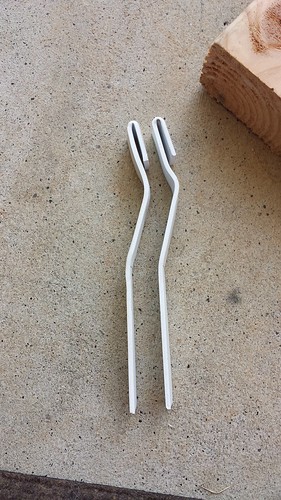
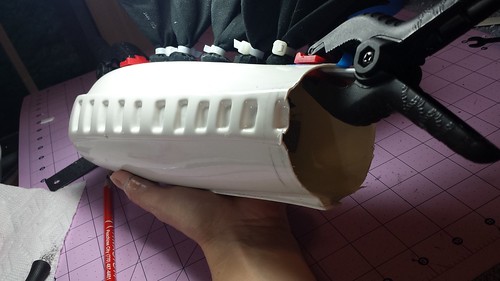
Since I was scoring and snapping, I thought I would make some bicep hooks from the other ABS I picked up from Amazon. I used the method as outlined in Ukswrath's tutorial for these.
I think I need a new pair of gloves...
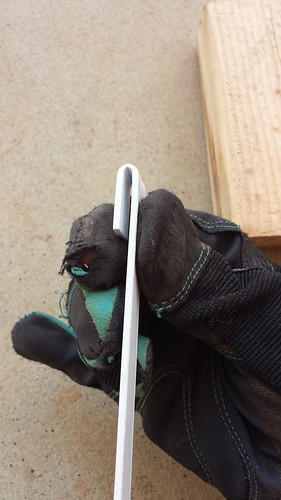
They're not as pretty as his, but they'll do the job.
Since I was scoring and snapping, I thought I would make some bicep hooks from the other ABS I picked up from Amazon. I used the method as outlined in Ukswrath's tutorial for these.
I think I need a new pair of gloves...
They're not as pretty as his, but they'll do the job.
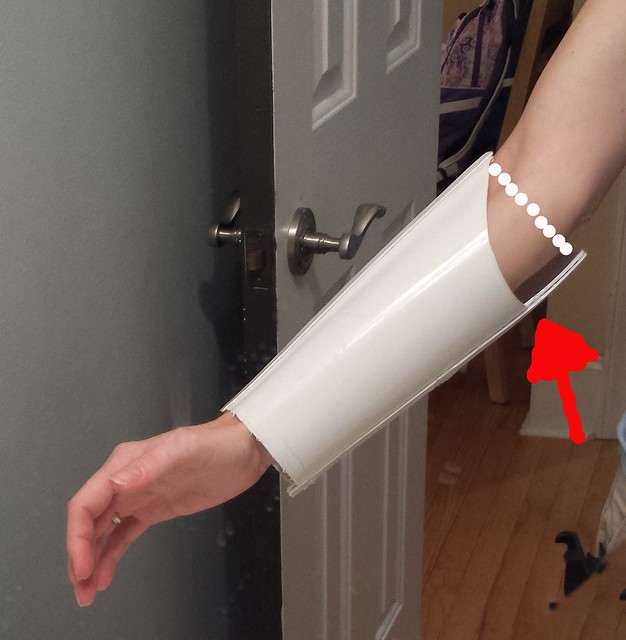
Messed Up the Stormtrooper Forearm! Gah!
Ugh. Hit a bump on my left forearm.
The top of the forearm has ridges that can't be altered due to my 15mm cover strips. Nothing was cut there. In fitting to my skinny arm, I was able to only adjust the pieces on the bottom of the forearm.
Regarding length of the forearm, I only trimmed one notch at the wrist, and there is still more that needs to be removed. I'm waiting to trim all of it until later. The only part of the top of the forearm that was removed was the flashing. (I did not overtrim any of it.) I could have avoided this problem by trimming from the top. But I didn't want to lose any of the detail at the top of the forearm, so top trimming for me was not an option.
Upon making the cuts and fitting the forearm, I have discovered that there is a big difference between the forearm pieces where they meet at the butt joint. This only occurs on my left arm, not my right.
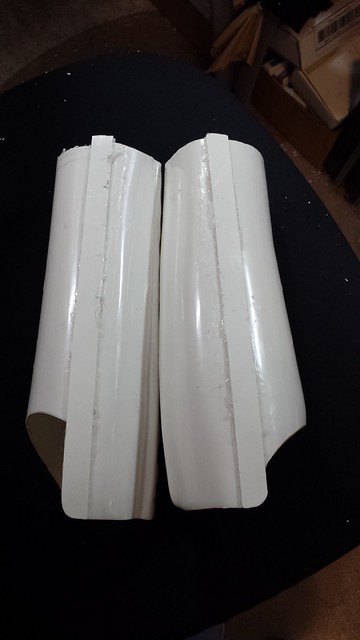
I could abs paste a piece of scrap to the arm (imagine a piece of ABS filling in on the arm to the dotted line), clean it up and refinish the edge. The repaired area wouldn't even be visible, and the arm would look more even. What do you think?
Here is a comparison between my left (on the left) forearm and the right. Please ignore the glue catastrophe (I've since cleaned it up, I swear!). This is as viewed from the bottom of the forearms at the butt joint.
The top of the forearm has ridges that can't be altered due to my 15mm cover strips. Nothing was cut there. In fitting to my skinny arm, I was able to only adjust the pieces on the bottom of the forearm.
Regarding length of the forearm, I only trimmed one notch at the wrist, and there is still more that needs to be removed. I'm waiting to trim all of it until later. The only part of the top of the forearm that was removed was the flashing. (I did not overtrim any of it.) I could have avoided this problem by trimming from the top. But I didn't want to lose any of the detail at the top of the forearm, so top trimming for me was not an option.
Upon making the cuts and fitting the forearm, I have discovered that there is a big difference between the forearm pieces where they meet at the butt joint. This only occurs on my left arm, not my right.
I could abs paste a piece of scrap to the arm (imagine a piece of ABS filling in on the arm to the dotted line), clean it up and refinish the edge. The repaired area wouldn't even be visible, and the arm would look more even. What do you think?
Here is a comparison between my left (on the left) forearm and the right. Please ignore the glue catastrophe (I've since cleaned it up, I swear!). This is as viewed from the bottom of the forearms at the butt joint.
I'll need a new inside forearm to fix this mess. I know that there should be some "swoop" (haha, I'll always think of my swooping forearms when I wear my TK now, thanks..."Swoop! Swoop!"), but the difference on the left seems so jarring between pieces. I wish that there was more of a gradual transition between them, rather than it looking like a piece was sliced out by Kylo Ren.
Gah. The pitfalls of being small in a big trooper world.
Gluing the Stormtrooper Arms
My left forearm fits!
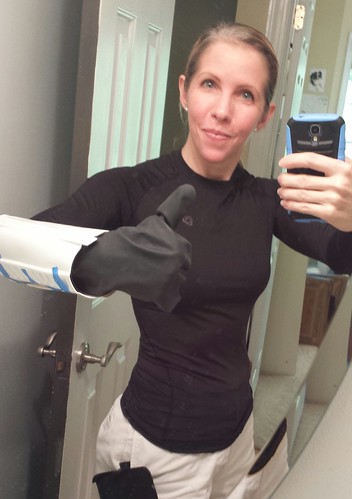
Well, it fits width-wise. (I'm bending my wrist a bit in this pic, so the forearm looks a little looser than it really is) I'm holding off on trimming the length down too much until everything is glued up. I've taken off one notch off the forearms at this point, and I still need to take off a bit more. I don't want to rush the fine-tuning of the fit just yet.
I feel like I've got the messiest build EVAH. Watching the Youtube build videos, they make it all look so easy and clean to attach cover strips. Me? I glue things down, and it's a complete mess of e6000, and I mean everywhere. Stuck to my fingers, on my arms, my shirt, in spots and areas all over the armor... I've even managed to get it in my hair. I know it will all come off with enough elbow grease, but still. Can't wait for the Gluing phase of this build to be done.

See in the pic above? Ugh. It looks so dirty at this point. I'll clean up everything once all my cover strips are on. I keep telling myself that Novus will come to my rescue at the end of the build and make it all okay!
Well, it fits width-wise. (I'm bending my wrist a bit in this pic, so the forearm looks a little looser than it really is) I'm holding off on trimming the length down too much until everything is glued up. I've taken off one notch off the forearms at this point, and I still need to take off a bit more. I don't want to rush the fine-tuning of the fit just yet.
I feel like I've got the messiest build EVAH. Watching the Youtube build videos, they make it all look so easy and clean to attach cover strips. Me? I glue things down, and it's a complete mess of e6000, and I mean everywhere. Stuck to my fingers, on my arms, my shirt, in spots and areas all over the armor... I've even managed to get it in my hair. I know it will all come off with enough elbow grease, but still. Can't wait for the Gluing phase of this build to be done.
See in the pic above? Ugh. It looks so dirty at this point. I'll clean up everything once all my cover strips are on. I keep telling myself that Novus will come to my rescue at the end of the build and make it all okay!
Gluing, Clamping Stormtrooper Arms, Painting Ab Detail
Here's a pic of today's progress:
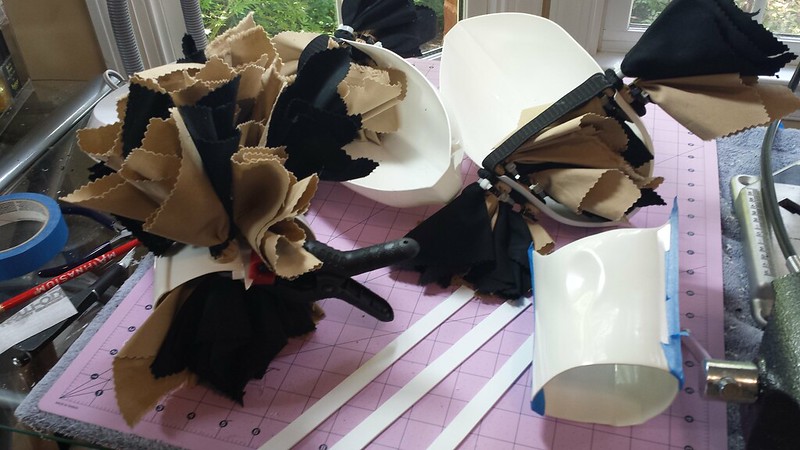
Lovely mess o' magnets and clamps.
Just adding my inner cover strips first before starting with the outer ones. I felt like adding the outer cover strip to my right bicep today, even though the other side isn't secured yet. Couldn't be helped. I was just too excited to see a tiny part of my armor look 'proper', even if it's covered with clamps and magnets for now.
And I painted these:
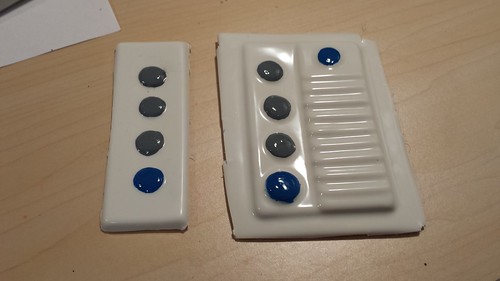
I still have to do some clean up around the edges, but it's coming along. I really like the painting part of this kit.
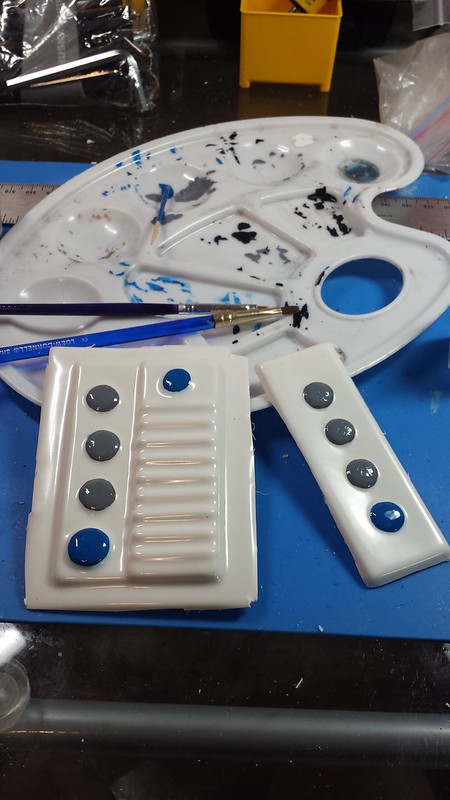
The nice thing about working with the Testor's paint is that it's really forgiving. It allows for lots of time to undo mistakes with some thinner. I even made a mistake of painting one of the buttons gray that was supposed to be blue. I easily wiped it all off with an old towel and some thinner.
For me, the best brush to use for the buttons is a small thin curved brush. Painting on the buttons is kind of like painting nail polish on your nails. With nail polish, you put a dab of polish in the middle of your nail, and push it down toward the cuticle. For the buttons, I put some in the middle, and pushed it gently outward to the edges. Any mistakes can be cleaned up after with a tiny bit of thinner on a very small brush. Besides, the button circles aren't supposed to be perfectly round if you're going for the screen authentic look.
Here's my setup for painting (and cleaned up buttons). These plastic palettes are awesome!
Lovely mess o' magnets and clamps.
Just adding my inner cover strips first before starting with the outer ones. I felt like adding the outer cover strip to my right bicep today, even though the other side isn't secured yet. Couldn't be helped. I was just too excited to see a tiny part of my armor look 'proper', even if it's covered with clamps and magnets for now.
And I painted these:
I still have to do some clean up around the edges, but it's coming along. I really like the painting part of this kit.
The nice thing about working with the Testor's paint is that it's really forgiving. It allows for lots of time to undo mistakes with some thinner. I even made a mistake of painting one of the buttons gray that was supposed to be blue. I easily wiped it all off with an old towel and some thinner.
For me, the best brush to use for the buttons is a small thin curved brush. Painting on the buttons is kind of like painting nail polish on your nails. With nail polish, you put a dab of polish in the middle of your nail, and push it down toward the cuticle. For the buttons, I put some in the middle, and pushed it gently outward to the edges. Any mistakes can be cleaned up after with a tiny bit of thinner on a very small brush. Besides, the button circles aren't supposed to be perfectly round if you're going for the screen authentic look.
Here's my setup for painting (and cleaned up buttons). These plastic palettes are awesome!
Stormtrooper Cover Strip Sizes
Progress.
Here's my reference list for cover strip sizes. I found this in the FISD, but I don't remember exactly where I saw it posted. I'm putting this here for my own reference... I keep misplacing the printed page where I've got this info, and I keep forgetting what file I put this in on my computer. Not feeling very organized lately!
Cover Strip Sizes
Got some elastic glued to the shoulder bells, too.
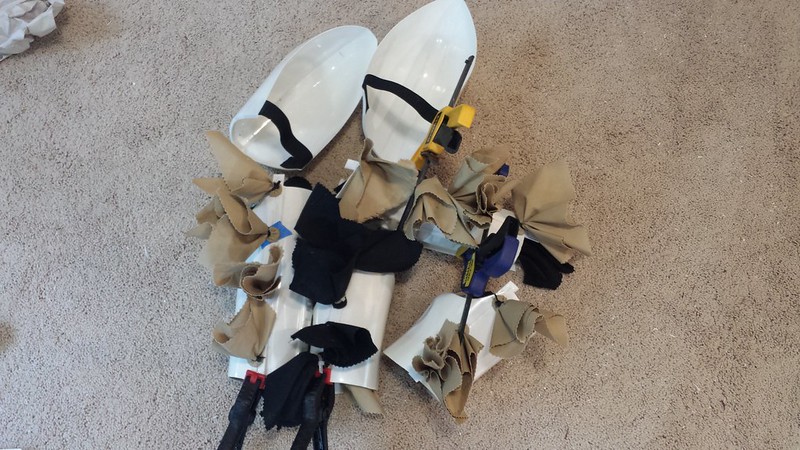
And trimmed down the left bicep. Both of my biceps are in need of some serious reshaping to fit properly. I'll tackle this after they're completely glued together. Here's a group photo of yesterday's progress. I didn't skimp on the magnets- I've got thirty sets- but I feel like I need more. I would have made more progress if I had more magnets! It's probably best for me to have taken a break while I was ahead anyhow.
Today I will be assembling the forearms. Feeling a bit more confident now that I've had some success in getting the biceps to fit my size.
Here's my reference list for cover strip sizes. I found this in the FISD, but I don't remember exactly where I saw it posted. I'm putting this here for my own reference... I keep misplacing the printed page where I've got this info, and I keep forgetting what file I put this in on my computer. Not feeling very organized lately!
Cover Strip Sizes
- Thighs (front and back)- 20mm
- Shins- 20mm
- Calves- 25mm
- Arms- 15mm
Got some elastic glued to the shoulder bells, too.
And trimmed down the left bicep. Both of my biceps are in need of some serious reshaping to fit properly. I'll tackle this after they're completely glued together. Here's a group photo of yesterday's progress. I didn't skimp on the magnets- I've got thirty sets- but I feel like I need more. I would have made more progress if I had more magnets! It's probably best for me to have taken a break while I was ahead anyhow.
Today I will be assembling the forearms. Feeling a bit more confident now that I've had some success in getting the biceps to fit my size.
Subscribe to:
Posts (Atom)
How to Build Magnetic Closures on Stormtrooper Shins
After being asked a gazillion times about how I built my magnetic shin closures, I've finally compiled everything from my TK build and p...
-
I found a wooden dowel yesterday when I was helping my son build a balloon-powered car, which gave me an idea: the dowel was the perfect dia...
-
After being asked a gazillion times about how I built my magnetic shin closures, I've finally compiled everything from my TK build and p...
-
This graphic helped me a lot to understand where the connections should be made on the knee and belt. These measurements are not exact- it ...


